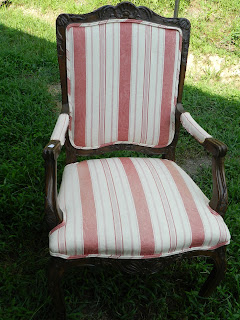
Remember this awesome chair I snagged at Goodwill for $15?!?
I started by ripping it apart. First tearing off the double piping, or welting as I found it is called in the upholstery world.
Then, using plyers, a special staple remover, and a hammer, started removing staples so I could get the fabric off.
It was VERY difficult not to damage the wood, and as you can see, I did do a little damage. But that will all be covered up shortly.
I only hurt myself this one time...looks ok...but it was deep!
After I got all of the fabric off, and many staples......I spray painted the wood with an ivory matte color. I am always a little afraid to paint over wood, because it is so beautiful, but I am so glad I did! The ivory really brought out all the detail and carvings in the wood.
I left the burlap and springs in the seat because they honestly weren't in that bad of condition. All other stuff got tossed.
After several coats of paint (the can said it was primer and paint in one...not so much), I was ready to cut my pieces of fabric. I bought a heavy weight home decor fabric in beautiful shades of blues and greens.
(This is why this tutorial is an almost tutorial.....I got very excited at this point and didn't take many pictures....)
I used the old fabric as a pattern to cut the new. I then used batting/foam to cushion up the seat and laid my fabric overtop. And began stapling. This is an artform. It took me a few tries to get it right....
But here it is!! Almost done! I just had to put the arm pieces on....and sew the double welting.....ugh I was dreading this part.
I looked up some other tutorials on the interwebs to see what others suggested. I knew I didn't want to buy an expensive foot for my machine, so I found a great tut that explained how to do it with a zipper foot and a reg. foot.
Place piping on one side of a strip of fabric and fold fabric over. Use zipper foot to stitch right along the side.....
Lay second piping beside the first. Fold remaining fabric over second piping......
Use a regular foot, go slowly, and stitch down the center.....
....and of course, my bobbin always runs out at critical points......
Just in case you were wondering...this is the awesome machine I use! My hubby got it for me for christmas a few years ago and I freakin love it.
Alright, back to the double welting. This is what the back side looks like after you have stitched down the middle.
Now, just cut off the excess....this becomes your back.
And here is the front!
Beautiful, home made welting.
Did you know that real upholsters use HOT GLUE to put the welting on?!?!? I was just as surprised. I love my hot glue gun. I slowly attached all welting to its proper place. Finally, I cut loose thread and cleaned her up a little bit.
Here she is!! All finished! The lighting in my living room is perfect for movies, not so perfect for photos.
Check out those arm pieces.....
Is she perfect? Absolutely not. Did I make some mistakes....you betcha. Do I love her....oh yea.
And here is the surprise back! Matches the welting and arm rests. I love a modern print with a more floral feminine one.
I'm proud of myself. It was a challenge and took a lot longer than I had assumed, but I think she is beautiful.
Onto the next project.......
Last night while I was singing back-up for a friends new cd (I know, I'm all over the place), my other friend who was there (it was her house..=) offered to give me a wooden rocker to reupholster!! I'm super pumped about doing that one!
Don't hold your breath though...its gonna take a little while to finish!
Until Wednesday......


3 comments:
Awesome Job Megan! This looks fantastic and makes me want to try it too.
Debbie W.(From the world of retirement)
That is incredible!! I am amazed at your talent and "just-try-it-and-see" attitude. I wish I were more crafty, but I don't like messes...there inlies my crafty-less-ness. So, instead, I will just gawk at your talent and tell you how great you are. How's that?! ;)
Fantastic! I love your fabric choices too. Also, how in the world did I not know you had a blog?
Post a Comment